
Tips for navigating the maps
These brief tutorials and tips will teach you how to use the most important tools for navigating the data in the maps and uncover what matters to you most.
Moving Around the Map
Changing Layer Transparency
Selecting/Viewing Data Layers
The Toolbox - Select
Changing Layer Visibility
The Toolbox - Swipe
The Share Tool
Finding layers
In the map, start by browsing the layers tabs in the upper right-hand corner of the map, on the yellow bar. You can see all the available layers by clicking the "All Layers" tab in the in the upper right-hand corner. Look for the globe icon—that's the All Layers tab.
To find a layer, scroll through the list or search (click on the magnifying glass to the right of the "Layers" header in the white pan).
To turn a layer on or off, click the check box to the left of the layer.
To see how the layer is represented on the map (e.g., is it an icon? a colored line?), click the down arrow to the left of the checkmark.
To declutter the map, turn off the default layers.

 Too many layers?
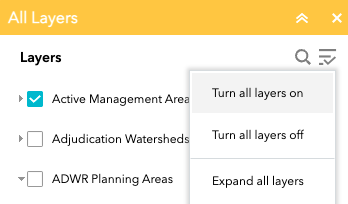
Try turning off all the layers to reset to the baseline map.
Click on the 3 lines with a checkmark in the upper right-hand corner of the All Layers pane.
Viewing detailed information
Once you've found some relevant layers, you can drill in for more detailed data.
To see details for a layer, click on the design in the map. It might be an icon, colored overlay, or line, depending on the data.
If you have multiple layers overlapping, you can click through the previous or next arrow on the information popup.

Working in the Groundwater Change App?
Our tutorials will help you navigate the application's most important tools